Christmas Card Painting - 2 Tutorials for your own Creative Cards
Christmas is just around the corner and we are all looking for creative ideas on how to surprise our loved ones. And what could be nicer than giving a gift that you have made yourself? In this article, I’ll show you two creative tutorials on how to paint your own Christmas cards.
Required drawing tools
For this exercise, we use a mix of several drawing tools. Here is a list for you:
– Fineliner (black)
– Pencil for the sketch
– Watercolors
Christmas Card Painting Video Tutorial
In this video, I show you step by step how to draw the two Christmas cards. Whether you’re just starting out with drawing or are already a little more advanced, you’ll be shown everything here, from the sketch to the finished drawing.
Can’t see the video? Then please accept the cookies used here first.
A video course and eBook for anyone who wants to learn to draw quickly and easily. The basics are quickly explained and practiced with lots of exercises.

Tutorial 1: Christmas Tree Motif
Step 1: Painting the Christmas tree
1. Start painting the Christmas tree with a blue color or a color of your choice.

2. Use a brush to draw a line from top to bottom to create the Christmas tree.

3. Use more paint and water and paint the tree a little darker in the middle.

4. Spread the paint in the middle while the paper is still wet.

5. Wait until the paint is completely dry. You can use a hairdryer to speed up the process.

Step 2: Draw in the Stars
1. Use a fineliner to draw stars or other Christmas motifs on your tree.

Step 3: Draw in Text
1. First determine the height you need for the text by sketching lines.

2. Use a pencil to sketch the desired lettering on your card.

3. Then use a felt-tip pen or a thicker fineliner to trace the lettering.

4. Allow the paint and ink to dry thoroughly before giving the card as a gift.

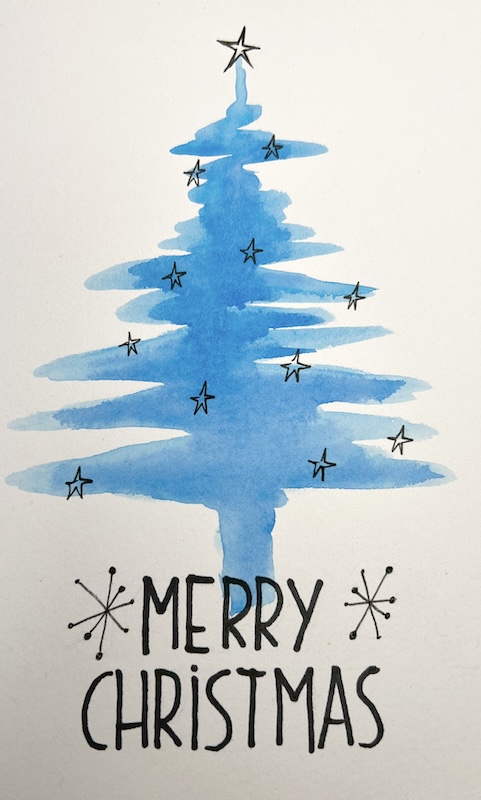
Your first Christmas card is now ready! So let’s get started on the next card.
Tutorial 2: Christmas Tree Balls Motif
Step 1: Sketch the balls
1. Start with a pencil sketch of the Christmas balls you would like to have on your card.

2. Then erase the sketch so that it is just visible so that you can apply the paint straight away.

Step 2: Coloring the balls
1. Start with the first ball and paint it in any color you like. Leave a small area free on the right.

2. Add more color and paint the left side of the ball a little darker.

3. Let the paint dry or use a hair dryer to dry the paint even faster.

4. Repeat these steps for each ball and allow each color to dry before you continue painting.


Step 3: Draw the Outlines of the Balls
1. Take a fineliner and draw the outlines of the balls. Use the sketch that is still visible.

2. Color in the details of the ball, such as the holders, the threads or the loops.

Step 4: Draw the Lettering
1. Sketch the desired lettering, such as “Merry Christmas”, onto your card.

2. Use a felt-tip pen or a fineliner to trace the lettering.

3. A pointed felt-tip pen can also be used to draw straight lines in lettering.

4. If you like, you can draw more lines as shadows of the lettering.

Your drawing is finished! If you would now like to continue, then here is a suitable drawing course for you.