In this apple drawing tutorial, you’ll get complete step-by-step guide on how to draw an apple using an alternative hatching technique. Of course, there is again a video tutorial for the exercise.
Apple drawing video tutorial
This tutorial will show you the complete exercise and how to draw the apple step by step. The complete annotated version is available in the Learn to Draw course for beginners.
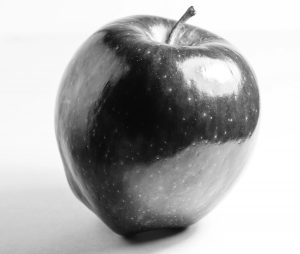
Here comes first the template for the apple drawing. Basically, before you start drawing, print out your template in black and white. You can then use this to identify the correct tonal values and then trace them even more easily.
If you still need a tutorial on how to customize your template accordingly, we have a suitable article and video for that as well.
As a drawing tool we use a 4B pencil in this exercise.
However, you can certainly do this technique with any drawing tool that draws a clear line on the paper.
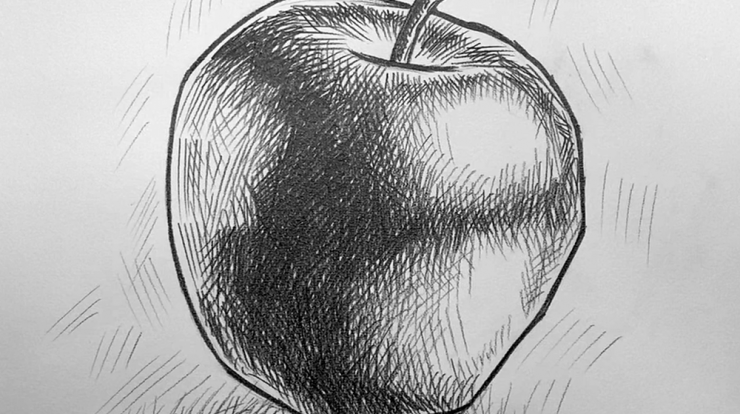
Draw apple tutorial
In this tutorial, you’ll get step-by-step instructions on how to draw an apple using an alternative hatching method. you can then apply this method to any image.
1. Divide template into tone values
Print out the template or simply follow these instructions. First look at the template and separate the areas with similar gray values by individual strokes. This will give you a clue as to which areas you should draw in and how dark.


For the hatching we use relatively short strokes here and always draw about 5 to 8 strokes next to each other. To create dark areas, we use cross-hatching. So we draw several lines on top of each other at a slightly different angle (see picture).
2. Apple sketching
First, draw a sketch of the apple and capture only the proportions and shape.

In the template you have already divided the areas for the individual gray values. Now transfer these to your sketch with very light strokes.

Now you have a very good base for your apple drawing.
3. Draw contours of the apple
Now draw the contours of the apple. Use more pressure on your pencil to create very dark and thicker contour strokes here.

4. Draw the first hatches
Now draw the first area using the hatching technique shown. Try to use the direction of the individual strokes to map the shape of the apple. This gives the apple its three-dimensional shape in the drawing.

Stick to the areas from your sketch. Don’t forget to change the angle after every 5 to 8 short strokes. This is what makes the style shown here.

 You can also find the complete commented instructions for this tutorial in our Learn to Draw course for beginners.
5. Define the dark areas with cross-hatching
By adding a second layer of strokes, which you then draw in at different angles, you create a so-called cross-hatching.
Tip: Put a piece of paper under your wrist to avoid accidentally blurring the strokes you’ve made so far.

The darker the area in your template, the more strokes you have to draw on top of each other. Stay with the number of strokes and don’t change the length of them either.

In between, feel free to draw in more strokes at the transitions to soften them a bit.

6. Shadows and background
Now you can add some shadowto your drawing. It is best to draw this without a contour. Also use some light hatch strokes around the apple to suggest a background. This adds some depth to the drawing.

With this you have finished your drawing of an apple. Now take another template and try the style on them.

Continue drawing now with the course for beginners
You can also find the complete commented instructions for this tutorial in our Learn to Draw course for beginners. This course also includes a complete eBookand a very detailed video coursethat will help you get started right away.
